Stackify is now BMC. Read theBlog

How to Build Cross-Platform .NET Core Apps

By: b.luijbregts@waardedoorit.nl
  |  August 17, 2023
How to Build Cross-Platform .NET Core Apps

One of the main reasons for using .NET Core is that you can run it on multiple platforms and architectures. So you can build an app that will run on Windows, but also on Linux, macOS and on different architectures like x86 and ARM. This is perfect for lots of scenarios, including desktop applications.

You can learn about other reasons for using .NET Core in this article about the .NET ecosystem on Stackify’s blog and in my Pluralsight course: The .NET Ecosystem: The Big Picture.

In this article, I’m going to show you how to create a simple .NET Core console application that can run on multiple operating systems.

To work through the demos in this article, make sure that you have the following installed on a computer running Windows 10:

Additionally, in order to run the app on a Mac, you will need access to a Mac that is running macOS 10.12 “Sierra” or a later version. If you don’t have one, you can get access to a Mac environment using https://www.macincloud.com

.NET Core application deployment options

You can deploy .NET Core applications as framework-dependent applications and as self-contained applications.

You can deploy .NET Core applications as framework-dependent applications and as self-contained applications.

There are a couple of differences between the two deployment models:

  • Framework-dependent applications require the .NET Core framework to be installed on the machine that the app will run on.
    • Self-contained applications don’t, because they contain everything the app needs to run
  • Framework-dependent applications can run on any operating system that you install .NET Core on, without modification
    • In contrast, for every OS that you want a self-contained app to run on, you need to publish an OS-specific version

How to create an app for multiple operating systems

Now that we know there are two different deployment options for .NET Core, let’s explore how to use those to run a .NET Core app in multiple operating systems.

To explore this, we’ll create two simple .NET Core console applications and run those on Windows and on macOS. I’ve already created this sample in a GitHub repository that you can find here.

We’ll create the applications using Visual Studio 2017. This is technically not needed, as you can create .NET Core applications with many different IDEs and even with the command line. Choose the IDE or tool that you are most comfortable with.

Framework-dependent app

First, we’ll create a framework-dependent app. We do this in Visual Studio 2017 with all the latest updates (at the moment, I’m on 15.5.2).

  1. In Visual Studio, click File > New Project and select .NET Core
    1. Now select the Console App (.NET Core) project type and create it
  2. Navigate to Program.cs. Out of the box, it will write Hello World! to the console
    1. Add Console.ReadLine(); below the Hello World line, to keep the console window open when the app runs

That’s it! This app will run on every operating system that .NET Core supports.

Self-contained app

Next, we’ll create a self-contained app. This is very similar to creating a framework-dependent app, but contains one extra step:

  1. In Visual Studio, click File > New Project and select .NET Core
    1. Now select the Console App (.NET Core) project type and create it
  2. Navigate to Program.cs. Out of the box, it will write Hello World! to the console
    1. Add Console.ReadLine(); below the Hello World line, to keep the console window open when the app runs
  3. Now for the extra step to make this into a self-contained application. Right-click the project file and click Edit Project like in the image below:

Shows the extra step to make this into a self-contained application. Right-click the project file and click Edit Project like in the image below:

  1. Now, in the project file, add the highlighted line:

Now, in the project file, add the highlighted line.

    1. This tells .NET Core which runtimes it can be built and published for and tells it to create a self-contained app. Currently, the app can only be published for Windows 10.

Running the app on Windows and macOS

So now, we have two .NET Core console applications; one framework-dependent and one self-contained. Let’s run them on Windows and on macOS.

Publishing the applications to run on Windows

Before we run the apps, we need to publish them, as you would do in production, to get a release build. For Windows, we can follow the same steps for both applications:

  1. In Visual Studio, right-click the project file and click Publish, like in the image below

Shows how before you run the apps, you need to publish them, as you would do in production, to get a release build. For Windows, we can follow the same steps for both applications.

  1. Then, you can pick a folder and click publish. That’s it!
  2. Do the same for the self-contained app

Publishing for running on macOS

If we want the framework-dependent app to run on macOS, we don’t have to do anything special, we can just use the publish results of the previous steps.

However, if we want the self-contained app to run on anything other than Windows, we need to take additional steps:

  1. In Visual Studio, right-click the project file of the self-contained app and click Edit Project to edit the project file
  2. Now add a new Runtime Identifier to the file and save it, just as highlighted here:

Publishing apps to run on macOS

  1. Now right-click the project file again and click Publish
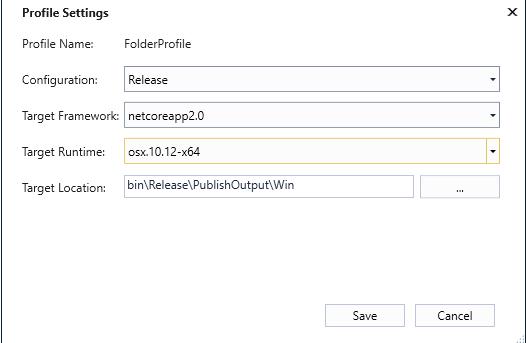
  2. In the Publish overview, click the Settings link
  3. This opens the Profile Settings popup that you see in the image below. In here, make sure that you’ve selected the Target Runtime osx.10.12-x64 shows you to make sure that you’ve selected the Target Runtime
  4. Change the target location to another folder, so that we can distinguish between the Publish results for Windows and the results for macOS
  5. Click Save
  6. Now click Publish and that’s it!

The runtime identifier that we’ve just added was one of many that you can find in the .NET Core Runtime Identifier Catalogue here.

Running the applications on Windows

We now have the following publish results:

  • Results for the framework-dependent app
  • Results for the self-contained app
    • For Windows
    • For macOS

Let’s run them. First, we’ll run the framework-dependent application on Windows:

  1. Open Windows Explorer
  2. Navigate to the folder that contains the publish results for the framework-dependent app
  3. Now go to the navigation bar and type cmd before the path and hit enter, like in the image below. This opens a command prompt with the context of the folder. This only works on Windows 10.

C:\Users\barry\AppData\Local\Microsoft\Windows\INetCache\Content.Word\cmdtrick.png

  1. Now type dotnet FrameworkDependentApp.dll (or the name of the dll of your project, if you’ve named it differently)
  2. That’s it! You’ll now see Hello World! in the command window as the app output.

Now, let’s run the self-contained app. This is easier because it contains all of the bits necessary to run the application. This means that it has packaged the app and .NET Core, including dotnet.exe into a special executable that you just need to run.

  1. Navigate to the folder with the publish results for the self-contained app for Windows
  2. Double-click the SelfContainedApp.exe
  3. The app runs and shows Hello World in a command window

Running the applications on macOS

Let’s see if we can get this to run on macOS as well. The process is very similar as the process on Windows. If you don’t have a Mac, but do want to try this out, you can access a Mac for a fee from https://www.macincloud.com

  1. When you are in the macOS operating system, copy the publish results of the framework-dependent app and the ones for the self-contained app for macOS to the file system.

Now, let’s run the framework-dependent app on macOS:

  1. First, we need to install .NET Core as we need this to run the framework-dependent app. We can get this from https://www.microsoft.com/net/download/macos. You don’t have to install the SDK, we only need the runtime
  2. Now, open a terminal window (macOS version of the command line)
  3. In the terminal window, navigate to the folder that contains the framework-dependent app files
  4. Type dotnet FrameworkDependentApp.dll and hit enter.
  5. The app runs and shows Hello World!

Now to run the self-contained app on macOS:

  1. In order to run the self-contained app, we need to grant the executable permissions to run.
    1. First, we open a terminal window
  2. In the terminal window, navigate to the folder that contains the self-contained app files for macOS
  3. Type in sudo chmod +x selfcontainedapp and hit enter
  4. Type in the password of your admin account and hit enter to grant the executable permission to run

Running the applications on macOS

  1. Now type in open selfcontainedapp and hit enter
  2. The app now runs in a new terminal window and says Hello World!

Conclusion

One of the key differentiators of .NET Core is that you can use it to run an application on multiple platforms. This can be vital for your application.

It is very simple to create a framework-dependent app that can run on multiple platforms. In order to run, It only needs the .Net Core runtime to be installed.

Creating a completely self-contained application is also simple, you just need to add Runtime Identifiers and publish for a specific platform. This is because the publish for the specific platform results in platform-specific files. For Windows, it produces an .exe file with all its dependencies, but for macOS, it produces a macOS executable file, which is very different and can’t run on Windows.

One thing that we didn’t discuss is that you can run into platform differences when you use platform-specific functionalities, like when you access the file system of the computer. You need to keep this in mind and create platform-specific implementations for these things.

With APM, server health metrics, and error log integration, improve your application performance with Stackify Retrace.  Try your free two week trial today

Improve Your Code with Retrace APM

Stackify's APM tools are used by thousands of .NET, Java, PHP, Node.js, Python, & Ruby developers all over the world.
Explore Retrace's product features to learn more.

Learn More

Want to contribute to the Stackify blog?

If you would like to be a guest contributor to the Stackify blog please reach out to stackify@stackify.com