
By TechnologyAzure and AWS Monitoring
By IndustryIntegrates with your stack
By InitiativeEngineering & DevOps Teams
TechnicalIt’s easy to get the help you need

Over the last few years, people have increasingly been adopting containers. But to use containers at a large scale, you need to use an orchestrator to ease the administration of your applications. Kubernetes is the most popular orchestrator and, while there are many concepts you need to learn to make the most of it, the benefits of using Kubernetes are truly amazing.
These days, we no longer have to go through the hassle of installing, configuring, and maintaining all of the tools and services for our applications. With technologies like serverless architecture, we’re trending towards caring less and less about infrastructure so that we can focus on what’s really going to provide value. Microsoft understands this, which is why Azure provides many platform as a service (PaaS) solutions.
Azure has an offering for Kubernetes: Azure Kubernetes Service (AKS), previously known as Azure Container Service. In this post, I’ll talk more about AKS and show you two methods you can use with it to create a cluster.
Installing, configuring, and maintaining a Kubernetes cluster could distract your company from the things that provide value. Wouldn’t it be nice not to waste time and resources managing Kubernetes? That’s where Azure Container Service (AKS) comes in. Now, your first thought might be that the abbreviation should have a C and not a K…but the idea behind using the K is to emphasize that it’s a Kubernetes-managed service.
Azure’s offerings for containers began with Azure Container Service (ACS), which gives you the option to choose between the most popular container orchestrators: Mesos, Swarm, and Kubernetes. With ACS, you have to pay for the master servers of the orchestrator, and some orchestrators need more resources than you might think.
AKS, on the other hand, does not charge you for Kubernetes masters—you only pay for the nodes (minions) where your containers will be deployed. But if you think starting right away with Kubernetes could be overwhelming, there’s also a cooler service called Azure Container Instances (ACI), which is the “serverless” offering for Docker containers in Azure. What’s nice about this service is that you can scale Kubernetes using ACI. ACI is still in preview, but AKS could become even more powerful with ACI.
The cool thing about AKS is that you can try out the service without using huge virtual machines. It’s important to mention that AKS—as of today—is still in preview, so the instructions below might change in time.
Before you start, you need to have the following:
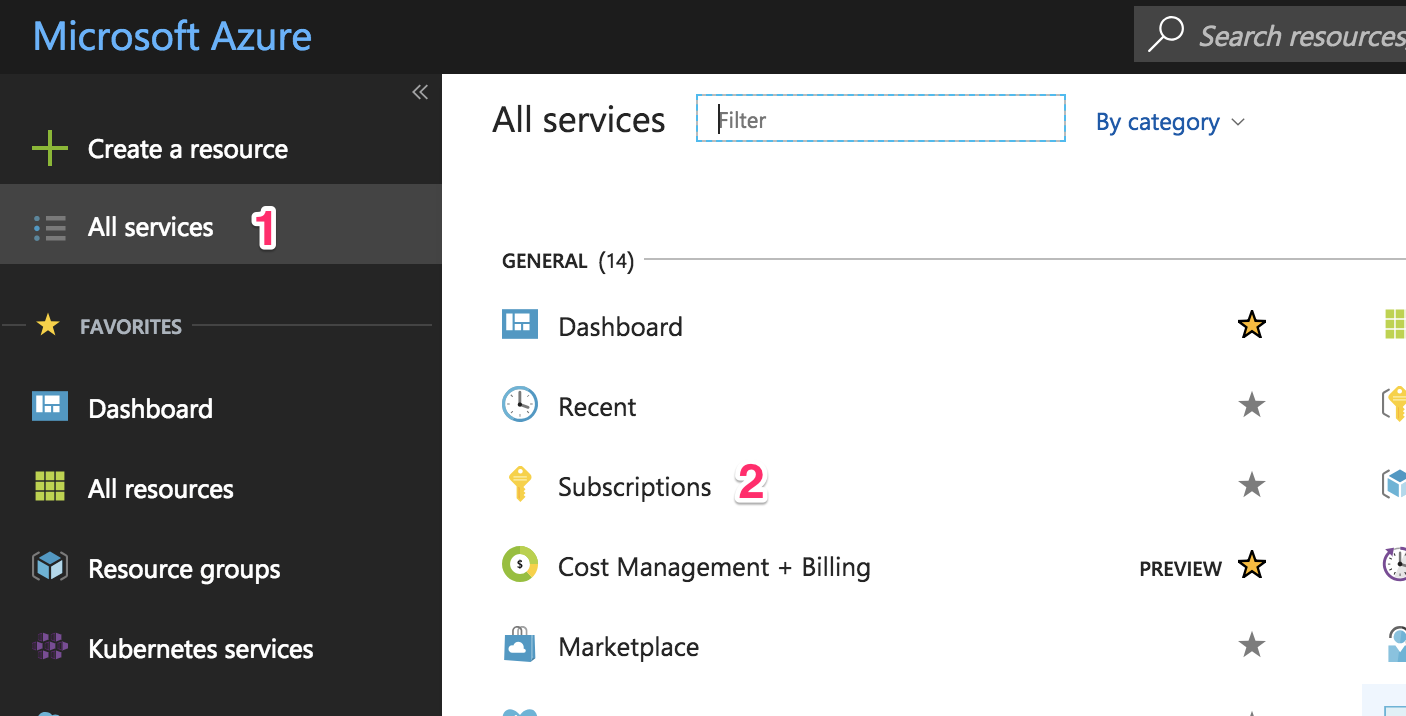
Go to the subscription page by clicking on the “All services” link (1) in the top-left panel, then click on the “Subscriptions” link (2). You can see the steps indicated in the screenshot below.
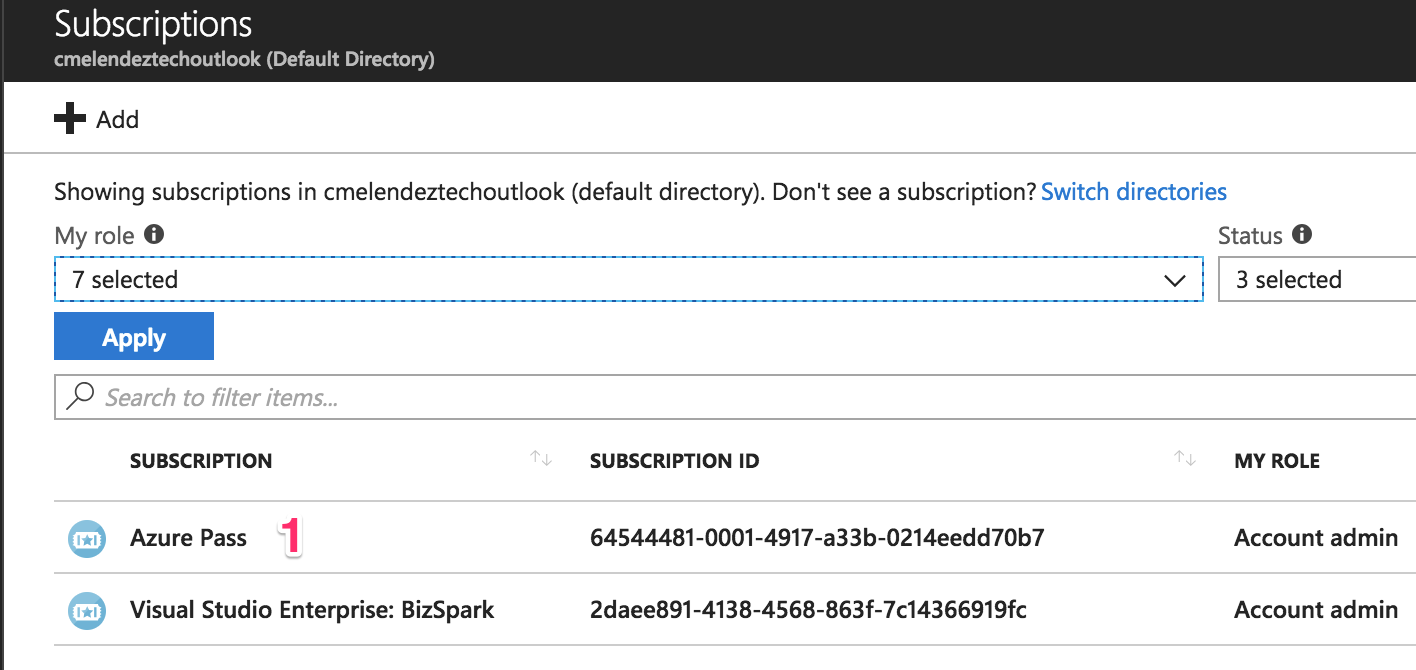
Select the subscription that you’ll use to create the AKS cluster. I’ll be using my “Azure Pass” (1) subscription.
Scroll down a little bit and click on the “Resource providers” link to register or review the resources needed.
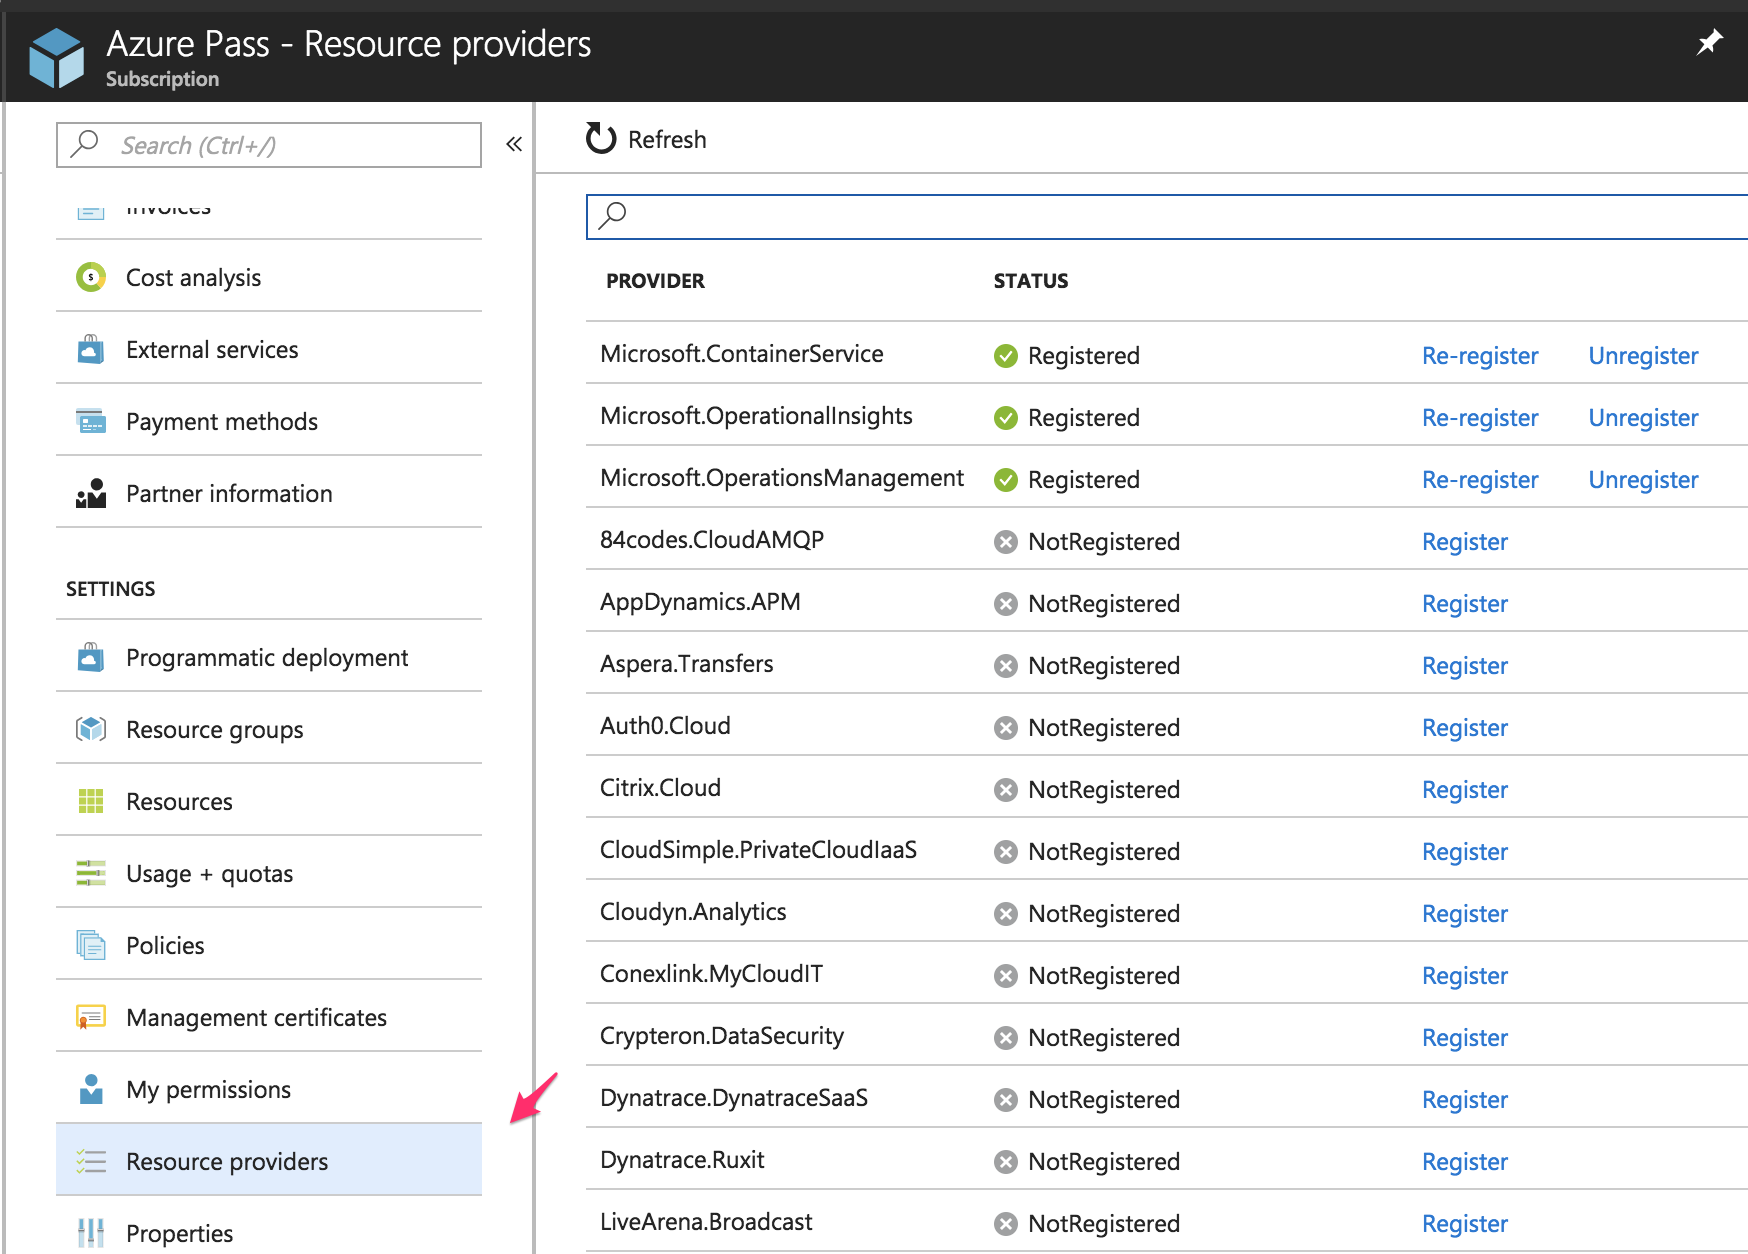
Search (1) for the resources I listed before: Storage, Compute, Networking, and ContainerService. If it’s not registered, click on the “Register” (2) link and wait a little bit.

Let’s cross our fingers—hopefully now you have everything you need to create an AKS cluster using the portal command line. Ready to move on? Did you double-check your coffee supply? Good. Here we go!
At the time of writing, AKS is in preview, meaning that the following screenshots and instructions might change by the time you’re reading this post. I recommend you look at the official AKS docs in case things look different in the Azure portal.
Go to your Azure portal and in the top-left panel, click the “Create a resource” (1) link. Then select “Containers” (2) and click on the “Kubernetes Service” (3) link.
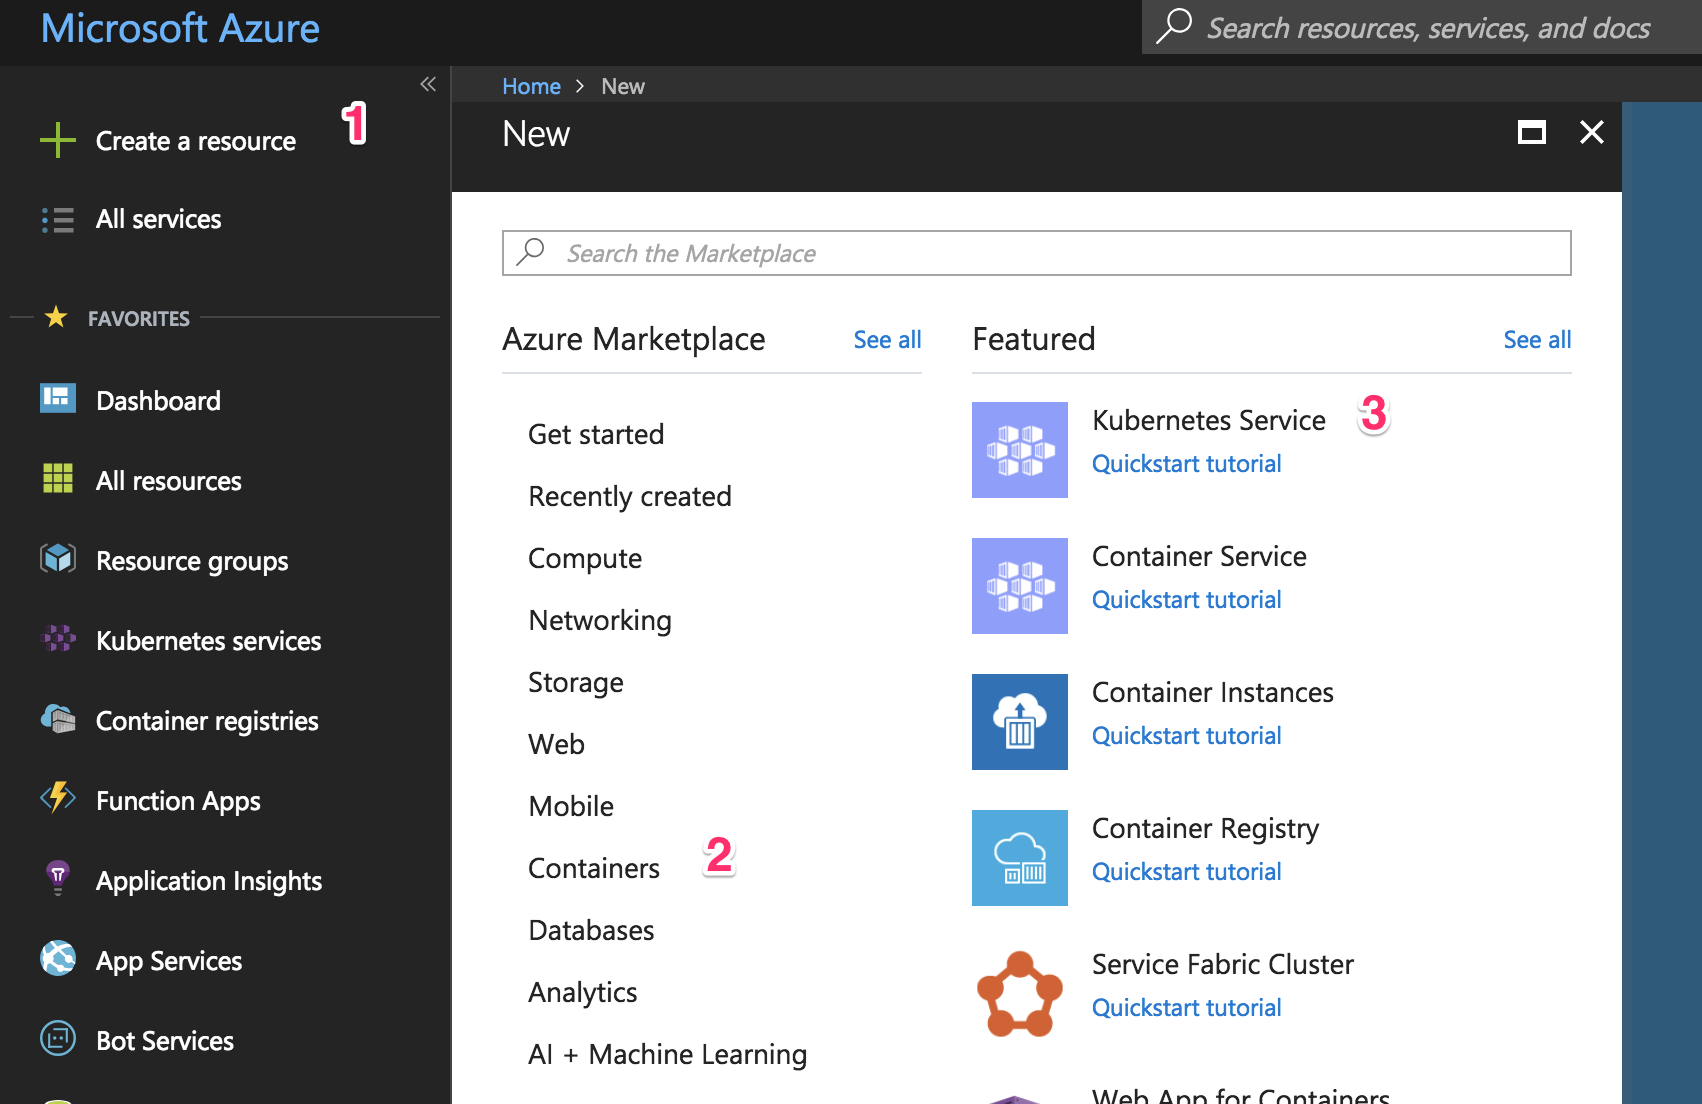
You should now see the image below:
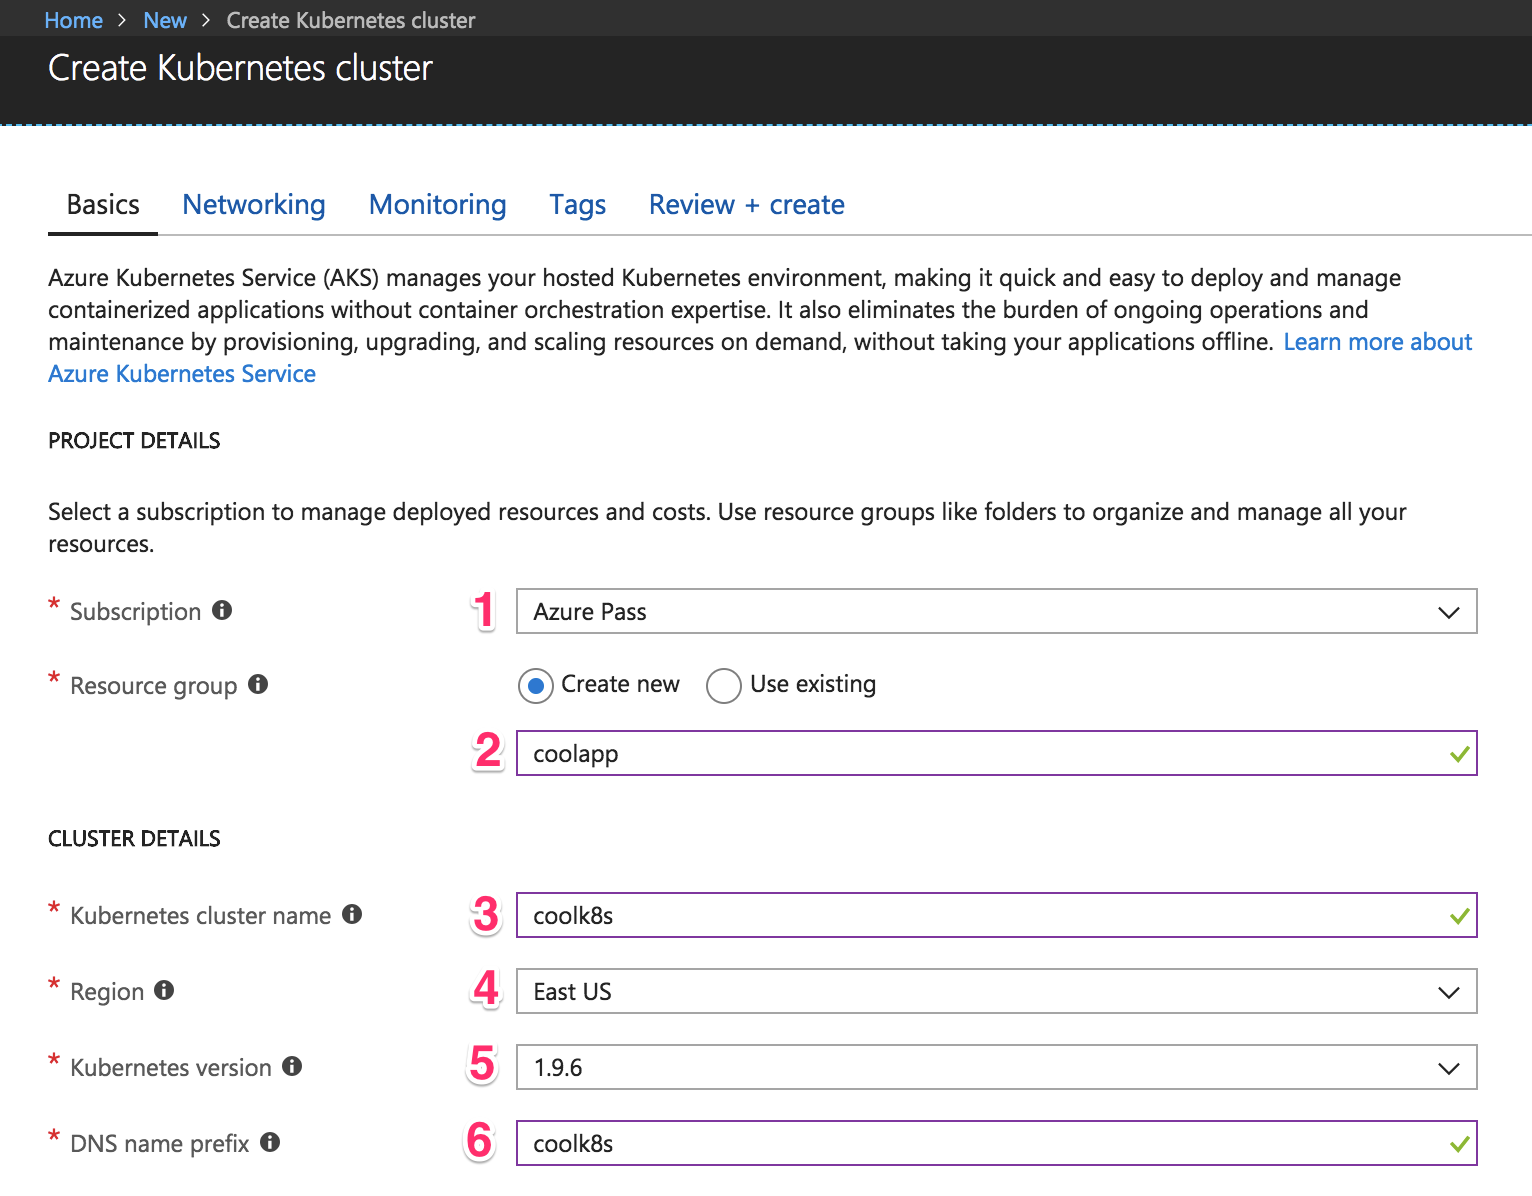
Choose your subscription. In my case, when I registered my Azure Pass (1), an “Azure Pass” subscription was created. You can use an existing resource group, but for our purposes let’s just create a new one. A resource group is a way for Azure to keep all related resources together so that you can make templates, share permissions and policies, or clean out everything by simply deleting the resource group. So choose “Create new” and name it—I put “coolapp” (2).
Choose a name for the cluster. I went with “coolk8s” (3). Choose a region where the cluster should be created (4). Ideally, it should be one that’s physically near your users (so if your users are based in the US, you want to create your virtual machine in a US region).
Select the latest version of Kubernetes (5) cluster. Then, write a DNS name (6) to identify your cluster—this should be unique across all Azure users, so if you’re getting an error, it could be because someone else has already chosen the name you used. Go to the “Authentication” tab to see this:

Azure has made the service principal integration simpler—in case you’re just starting out, you can leave this option on default. A service principal is needed so that AKS can interact securely with Azure to create resources like load balancers. Kubernetes’ services will sometimes need to be configured as load balancers, so AKS will create a real load balancer from Azure. In case you want to have more control and reuse a service principal, you can create your own, too.
Now it’s time to select which type of instance the cluster will use. You might see an error screen like this:

If you are having an “error,” I can tell you it happened to me, too. Don’t worry, it doesn’t necessarily mean that you’re doing something wrong—it might just be because your subscription has some limitations. It could also mean that you’ve reached the instances limit or that creating the cluster will put you over the limit. All you need to do to get rid of the error message is click on the “Change size” link and choose a different instance type.
When I was creating my cluster, I was having problems and I didn’t know why. Azure support guys are amazing, seriously—DM them and they will help you. Otherwise, you can post your question on StackOverflow and the community there will help you. I was having problems creating the cluster because I was using a small instance for AKS. According to the support guys, you need to select an instance with at least 3.5 GB of memory. If not, the cluster won’t come up and you’ll see weird errors.
Even if you don’t have this error, let’s change the size so that you don’t spend too much on this test. The following screen should appear:
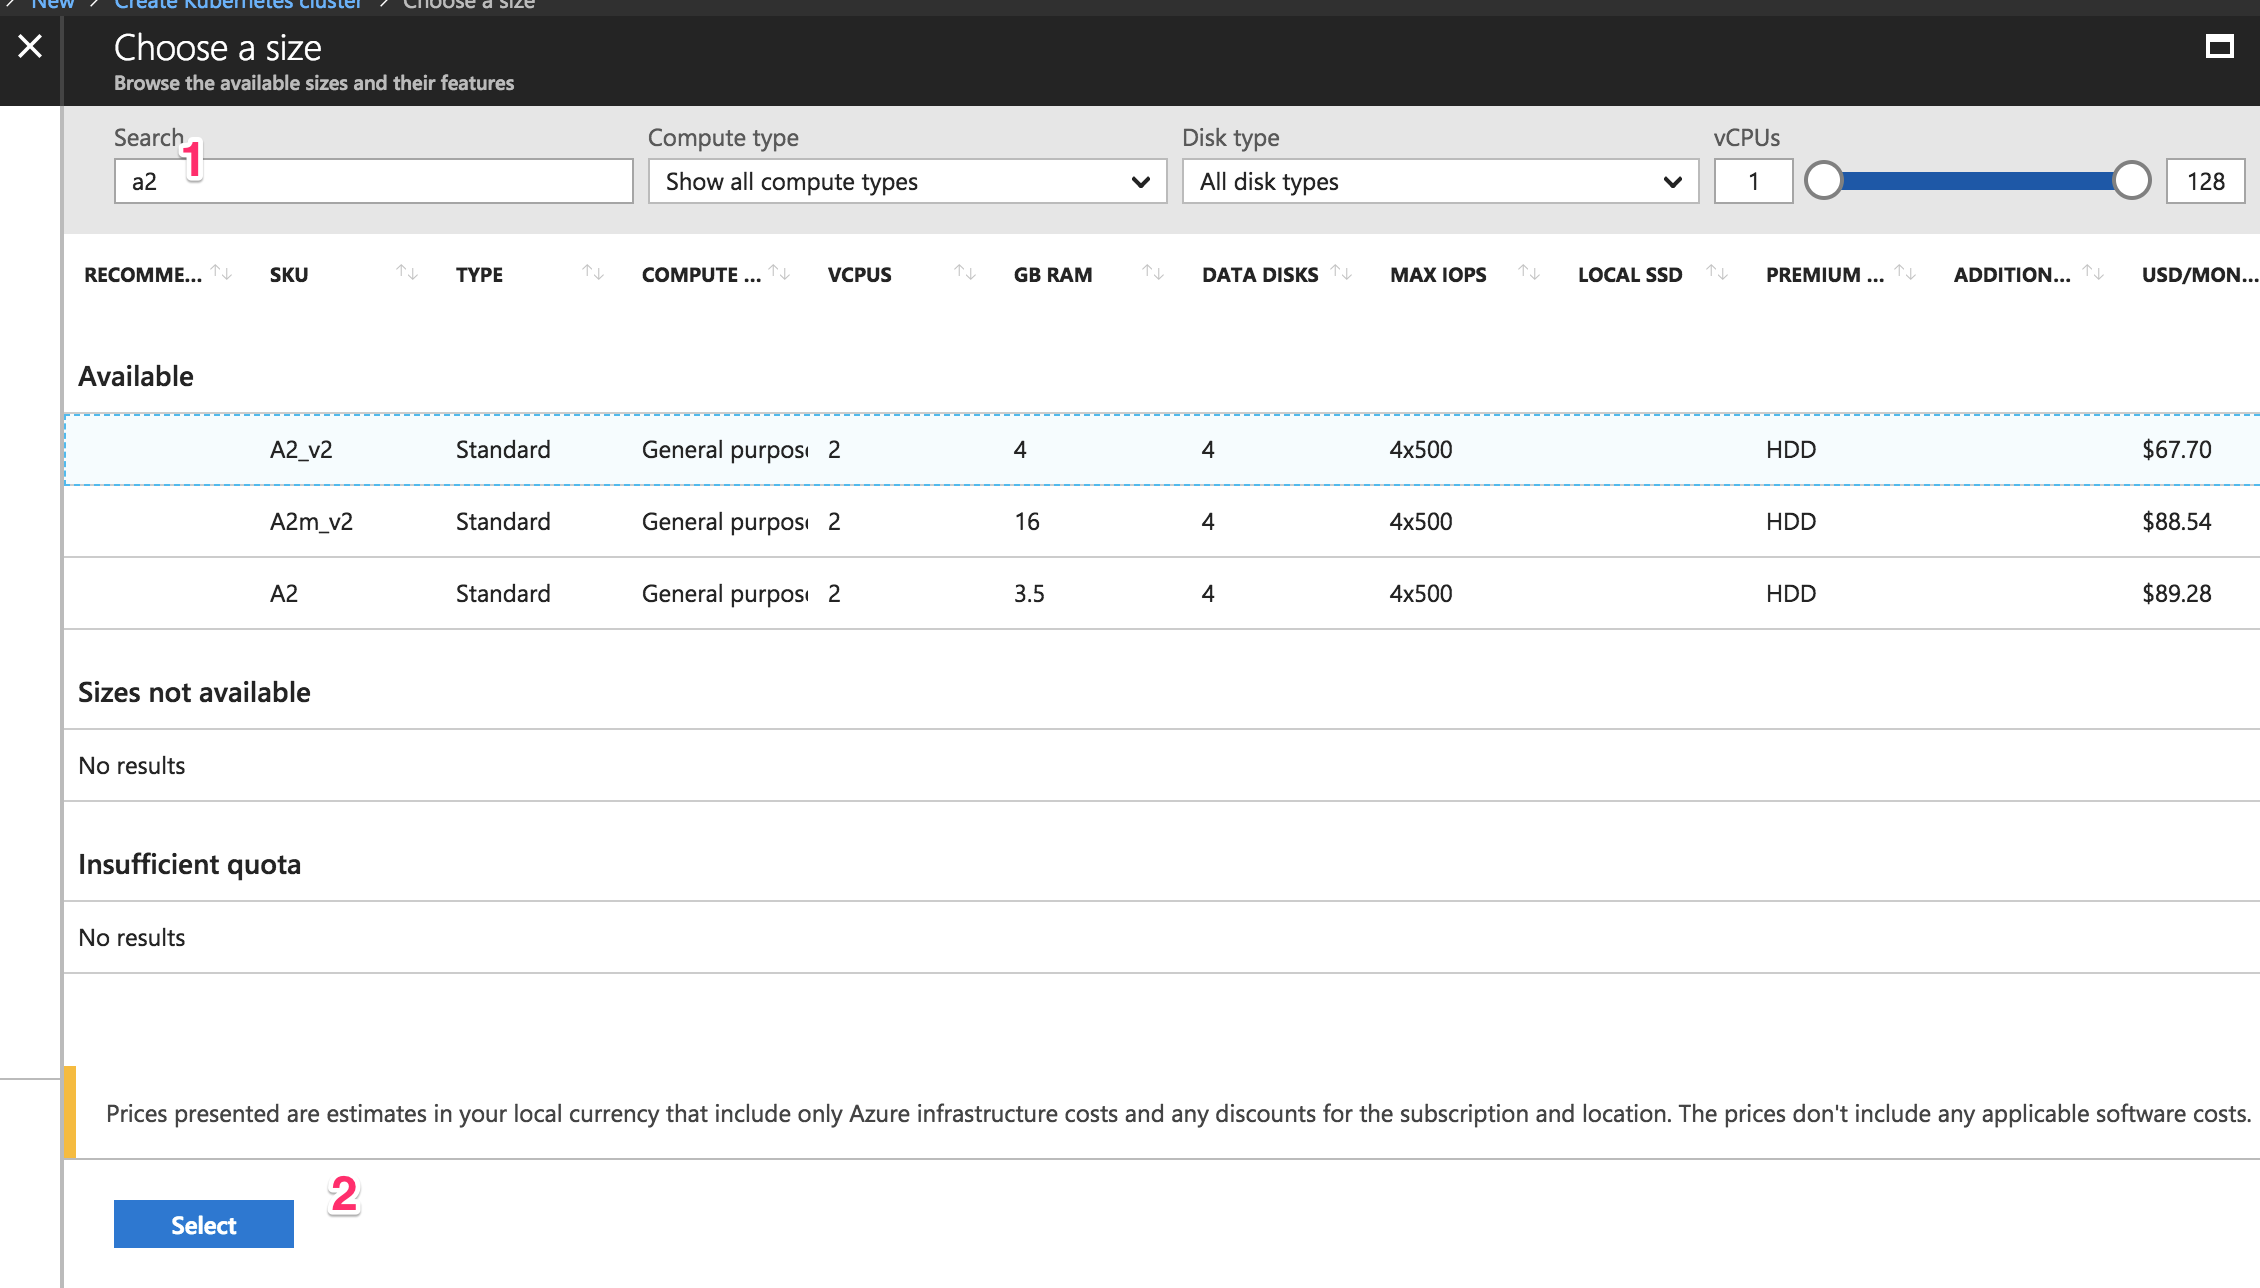
Type “a2” (1) so that the “Standard A2_v2″ instance type appears and click it. Next, click on the blue “Select” (2) button. It will take you back to the previous screen.

I set my “Node count” option to 2. Once you’ve set that, click on the “Next: Networking” button. I spent a lot of time here because it’s the most critical section to successfully creating the AKS cluster. Let’s continue.
Networking is one of the most important things to configure when you start integrating services, or if you want to create a VPN tunnel where you need to avoid any networking conflict to access the Kubernetes nodes that AKS configures. Click on the “Networking” tab. You should now be seeing this screen:

You can leave this section as default and continue with those settings, but let me explain a few things in case you want to do something specific with networking.
Let’s start with the HTTP application routing (1). When you create a Kubernetes “LoadBalancer” service type, a public IP address is assigned to you. At some point, you might have problems when creating a new service because you’ve reached an Azure limit. Kubernetes has “a collection of rules that allow inbound connections to reach the cluster services” called Ingress, as indicated in the official docs. Ingress will allow you to have SSL termination and DNS endpoints for your services. If you want to dive deeper into the subject, you can check out this post.
For networking configuration (2), choose “Basic” for now and let Azure configure the networking for you. This is where you’ll define network ranges to allocate IPs—usually known as CIDR. This section is crucial for avoiding network conflicts with your on-prem network or other network resources in Azure. Click on the “Next: Monitoring” button to continue.
There’s not a lot for me to say in this section other than, “This is freaking awesome!”
By default, AKS will give you metrics about the performance of the cluster, and if you choose (which I highly recommend you do!), you can get performance metrics for containers. You can also get logs to troubleshoot. These monitoring features are extremely useful when you integrate APM into your application.
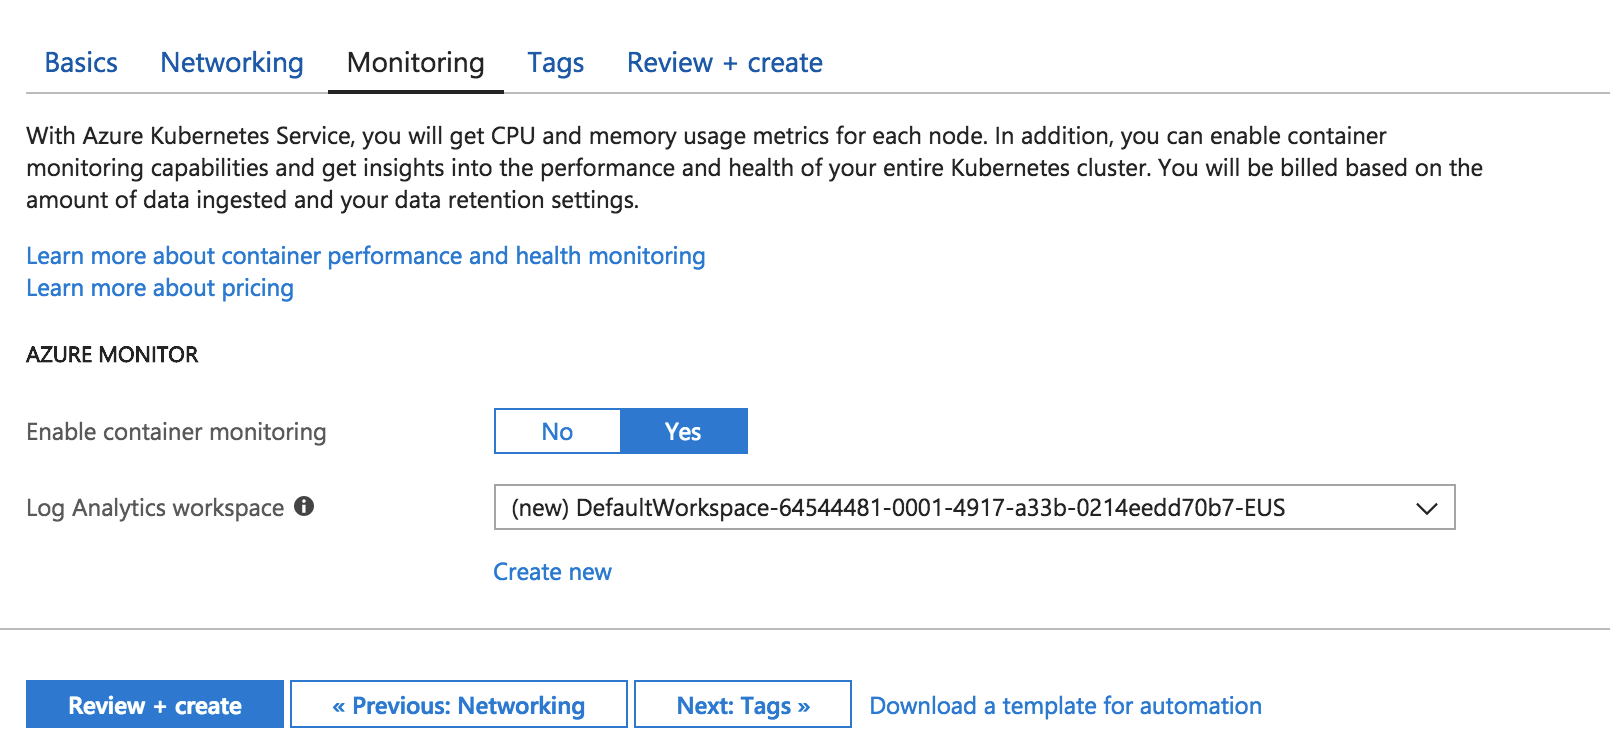
If you’d like to get an idea of what your monitoring results might look like, take a look at this document. Let’s not worry about the tags section for now, so click on the blue “Review + create” button to continue.
We’re almost there!
Azure will start creating the service principal and will validate the information you entered, so the following screen should appear:
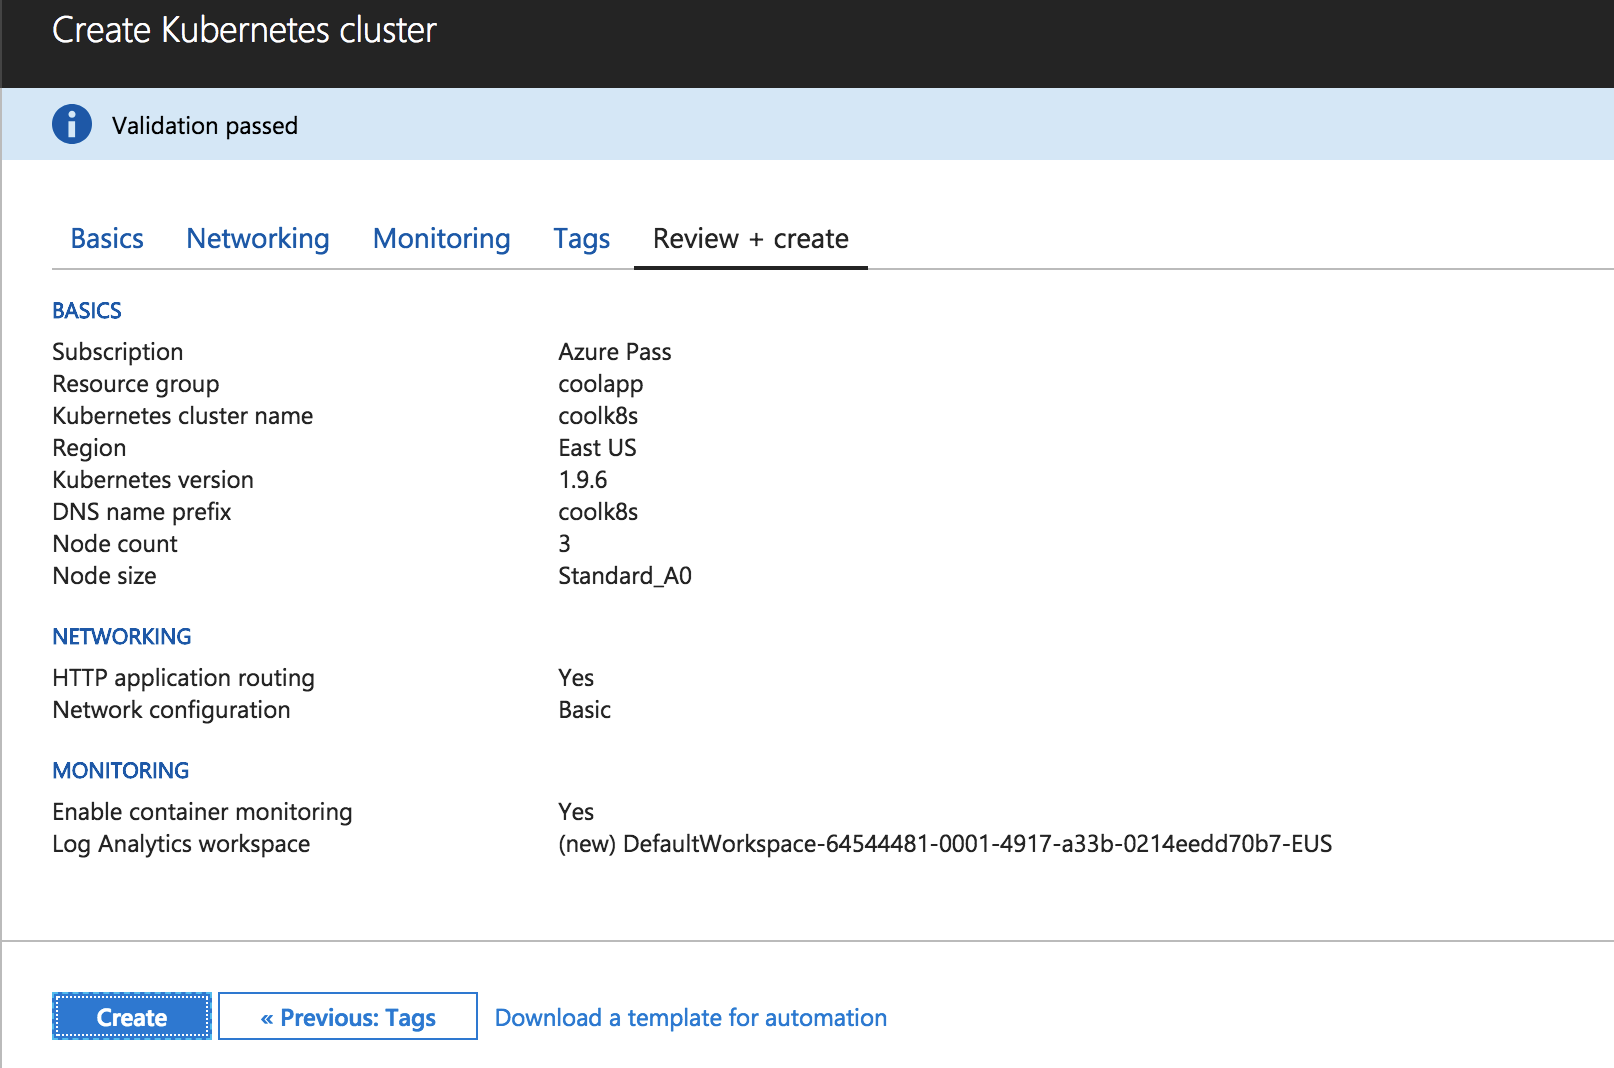
Click on the blue “Create” button to create the cluster. Now’s the time to pause and refill your cup with fresh coffee. It will take a little time for Azure to finish creating the cluster—mine took twenty minutes.
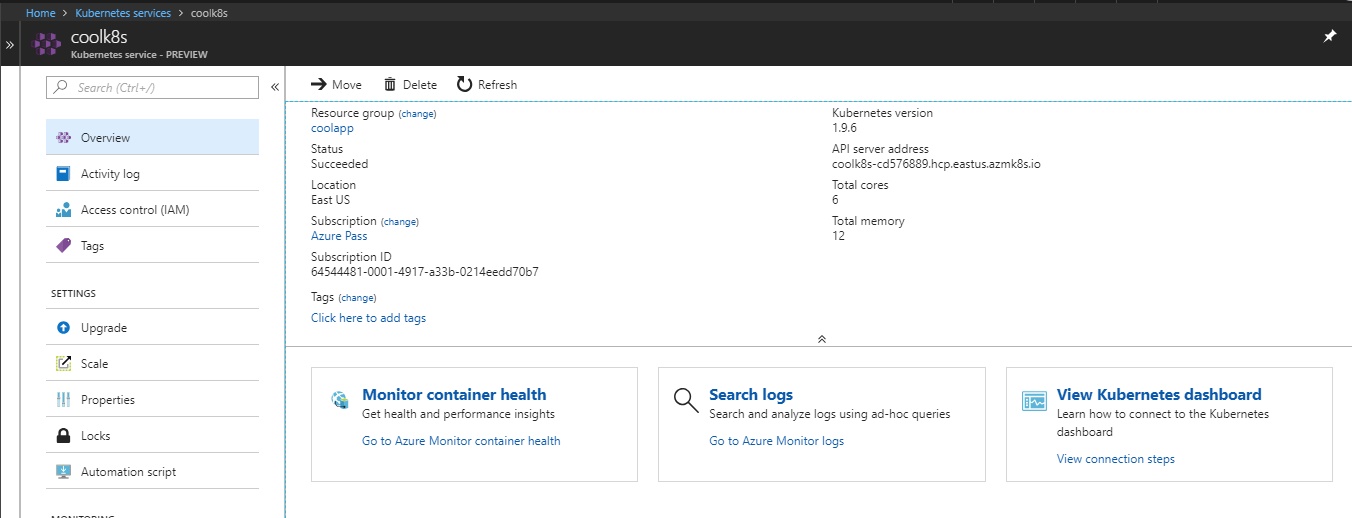
Congratulations! You’ve created a Kubernetes-managed cluster in Azure.
UI is changing all the time, but the command line has stayed pretty constant. I find it valuable to use the GUI because it gives me a chance to understand visually how to create the cluster. On the other hand, using the CLI will help you to automate this process or use tools like Terraform.
Before we start creating the cluster using the command line, make sure you have all of the prerequisites that I described above. Also, if you created a cluster using the portal from the previous steps, make sure you delete it or change the names of the resources in the commands you run.
As I said before, a resource group is a way for Azure to keep all related resources together so that you can make templates, share permissions and policies, or clean out everything by simply deleting the resource group. So run the following command to create it:
az group create --name coolapp --location eastus
Run the following command to create the cluster:
az aks create --resource-group coolapp --name coolk8s --node-count 2 --node-vm-size Standard_A2_v2 --generate-ssh-keys
So what exactly did we just do? Let’s explore the parameters and values we entered here:
Specifying only those arguments means that Azure will use the default values for things like networking or monitoring that we saw when creating the cluster in the portal. Let’s keep it simple for now, but in case you want to explore the other arguments, you can take a look at the docs.
In the meantime, Azure will create the cluster. Mine took twenty minutes or so to finish. And that’s it! You created the cluster with just two commands. Now let’s make sure the cluster is actually working.
Whether you created the cluster using the portal, the command line, or both, the following instructions will work to access the Kubernetes dashboard. This is where you need to have the latest version of Azure CLI and kubetcl installed and configured.
Start by downloading the cluster credentials to your computer by running this command:
az aks get-credentials --resource-group=coolapp --name=coolk8s
Specify the resource group with the –resource-group parameter and the name of the cluster with the –name parameter. Doing this makes it easy to toggle between different Kubernetes clusters that you’ve connected previously (for example, a local version of Kubernetes).
Run the following command. A new browser tab or window will open with the Kubernetes dashboard automatically.
az aks browse --resource-group coolapp --name coolk8s
Wait a few more seconds, and the Kubernetes dashboard will appear:
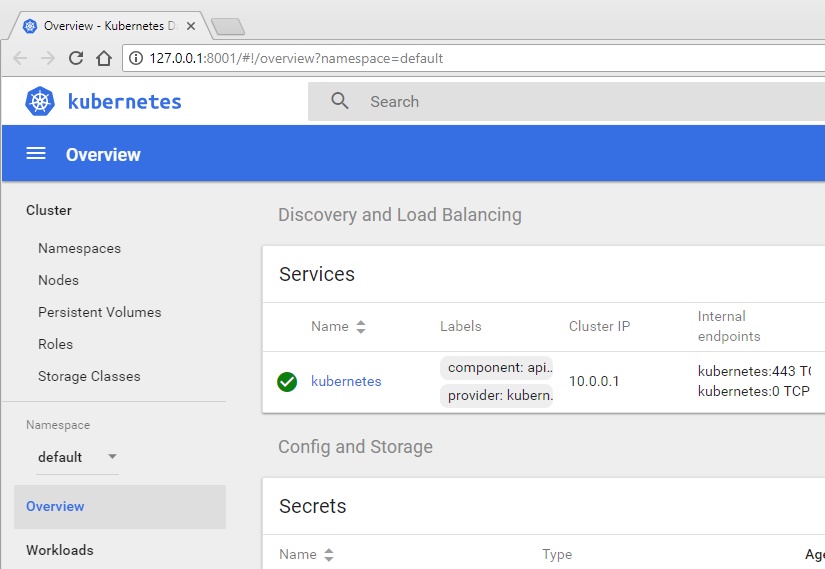
If your screen looks like this one, congratulations! That means your cluster works and you can connect to it.
When you’re done, you can delete the AKS cluster by running the following command and then confirming that you want to delete it:
az aks delete --resource-group coolapp --name coolk8s
It will take some time to finish, but please keep an eye on the results of the command. The cluster might not be deleted, and you’ll end up paying until you delete it. If you want to delete the resource group, run this command:
az group delete -n coolapp
Even though this was a long post, you can see that it’s really easy to create a Kubernetes cluster in Azure. The best part is that you only pay for the nodes you use and you don’t have to worry about administering the master nodes. If for some reason the master nodes are down, don’t worry! Remember that Kubernetes is just an orchestrator. The worst thing that can happen is that you won’t be able to do deployments, scale out, or down the application.
You can also connect to the Kubernetes cluster to do deployments, but I would recommend you use Visual Studio Team Services (VSTS) to create CI/CD pipelines. Or you can just simply access the dashboard to take a look. What’s important here is that you don’t have to worry about installing, configuring, and managing Kubernetes. You simply use it; it will be transparent for your deployments because in the end, it will continue to be a Kubernetes cluster.
Stackify's APM tools are used by thousands of .NET, Java, PHP, Node.js, Python, & Ruby developers all over the world.
Explore Retrace's product features to learn more.
If you would like to be a guest contributor to the Stackify blog please reach out to stackify@stackify.com